Archive for January 28, 2013

Crochet Flower Fabric Rug For Mom

Crochet Flower Fabric RugCrochet Flower Fabric RugCrochet Flower Fabric RugThis rug was one of the first projects I found on Pinterest. It is a relatively simple project. The only skills you really need are basic crochet skills and a lot of patience. Preparing your fabric can take twice as much time as crocheting the rug.

Make “yarn” out of fabric:

There are two ways to do this. The tortuous way (the slip knot method) and the preferred way (the t-shirt yarn method). Previously, I would use the t-shirt method for pillow cases or duvets and the slip stitch method for sheets, curtains, and other fabrics. I do not like the slip stitch method. It can leave lumps and “tags” in your finished projects which can become loose over time and more importantly, it is the BIGGEST pain knotting them together. This is the process that prompted me to ask for a sewing machine for Christmas.

I considered including a tutorial for the torturous way, but A. I hate it and B. Gillian at Ecletic Me, explains it way better in her fantastic blog post (and with pictures).

My favorite way is also used to make t-shirt yarn. So if you decide to make your rug out of stocked up t-shirts you only need to modify this pattern slightly by incorporating the tube theory by cutting off the upper half of the shirt (underneath the armpits).

I used 30 yards of fabric/48 inches wide to make the rug. Assuming you are starting with the same measurements, the first thing you want to do is cut your fabric into 10 yard lengths. The best way to do this is to ask the craft store to cut it this way for you as they have a long table and sharp scissors. However, if you order it online as I did you can use a yard stick, fold it in thirds, or if you have a really long house lay it out and cut it. I did not do this. I am so anti slip knot that I tried to make my fabric one long 30 yard loop. DO NOT DO THIS. YOU WILL BE SORRY.

If you do not have a sewing machine, do not have a friend who has a sewing machine, or are not (cringe) sewing by hand and have opted to use the slip knot method skip to “Crochet your Rug”

Once you have your 10 yard piece you need to make the fabric into a loop. To do this take the end pieces of the fabric and sew it together. I went back over my fabric twice with the sewing machine to reinforce the stitches.Crochet Flower Fabric Rug

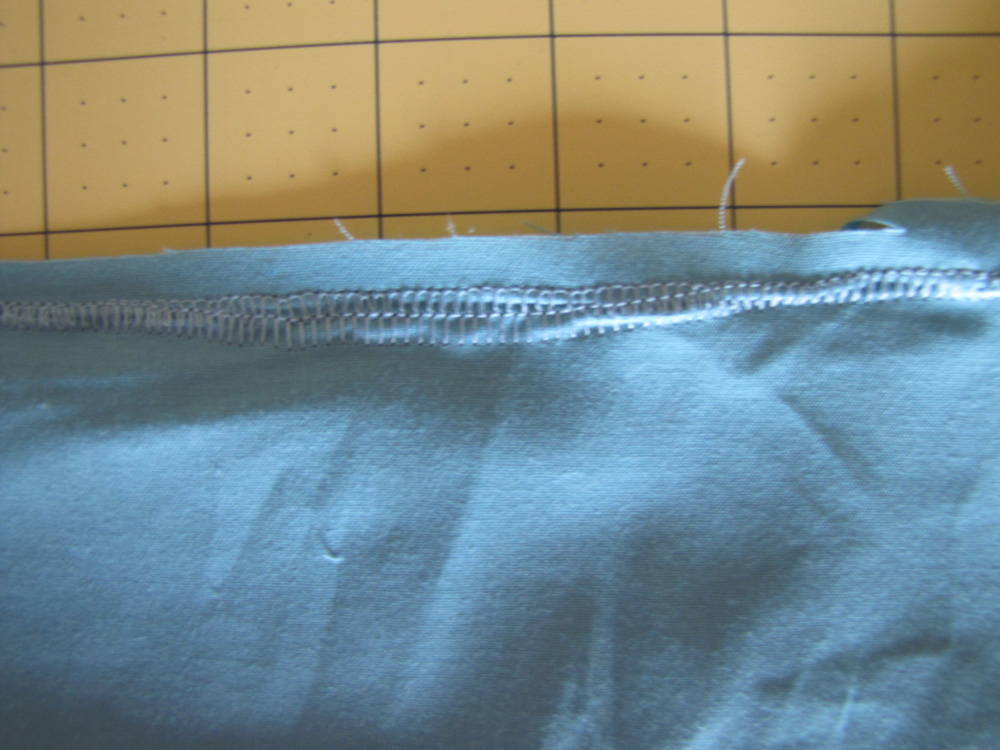
All you really need are scissors and a ruler to cut your fabric. I am the sloppiest cutter ever. I use a rotary cutter, rotary mat and a shape cut to keep me from going crazy with the rotary cutter. Even when I try and use this wide variation of tools which basically amounts to crafting training wheels, I still somehow manage to get a snake after a meal look to my fabric strips every once in awhile.IMG_1774-Edited

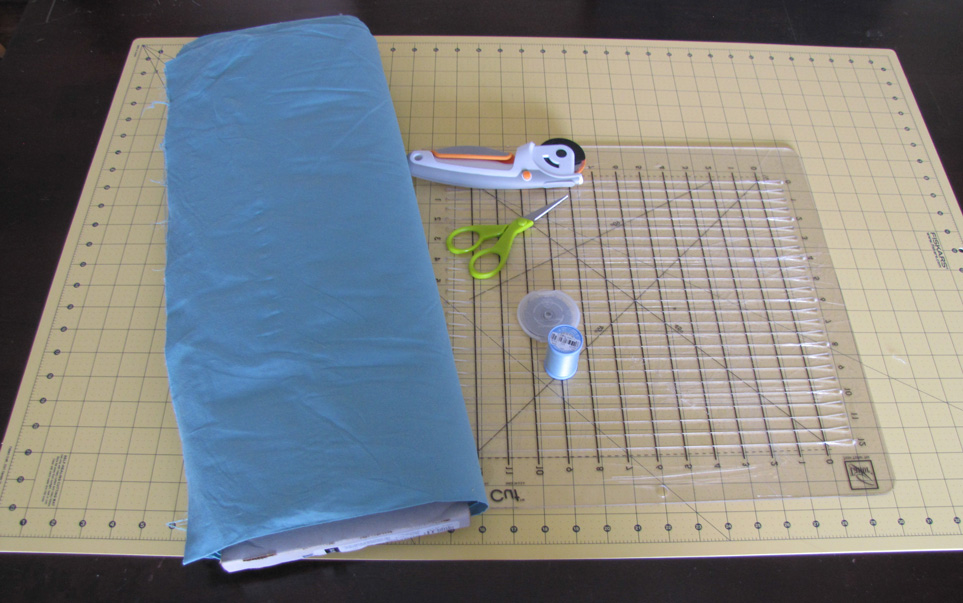
What’s most important in this process is that when you get to the top of your fabric you leave a inch to 1.5 inch area margin uncut. (see picture) It is important that you do not cut through the end of the fabric. If you do, visit the split knot blog for instructions on how to tie your strips together.IMG_1783

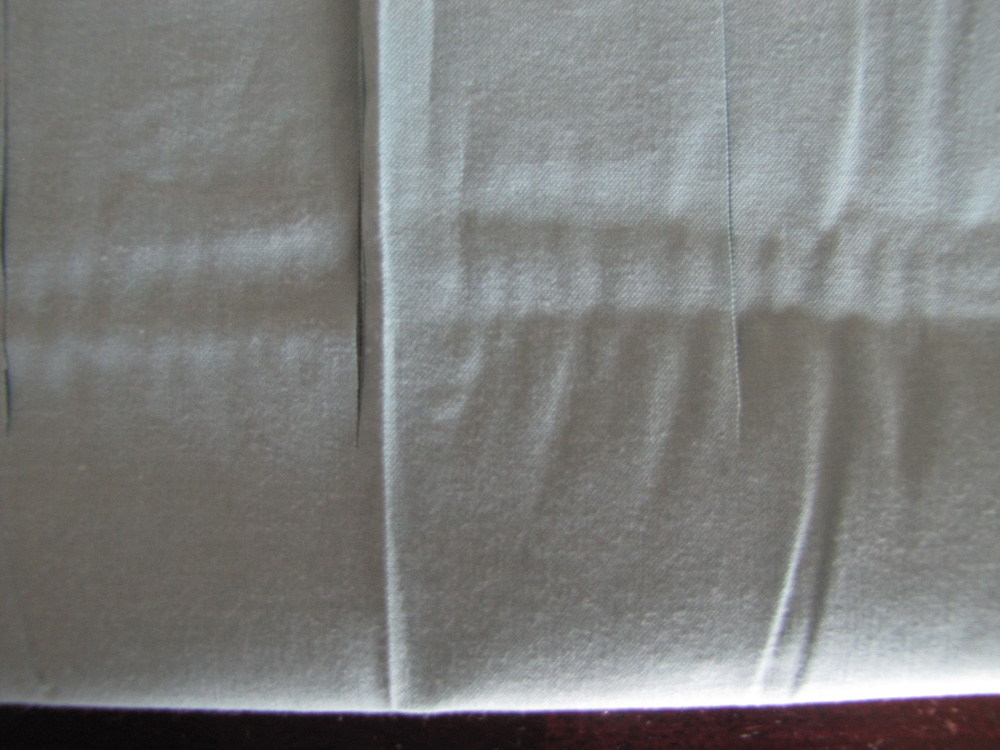
Once you’ve finished cutting your fabric, slid your arm, husband’s arm or some handy PVC pipe inside the fabric. Cut diagonally from the first strip to second strip on the other side.
IMG_1822

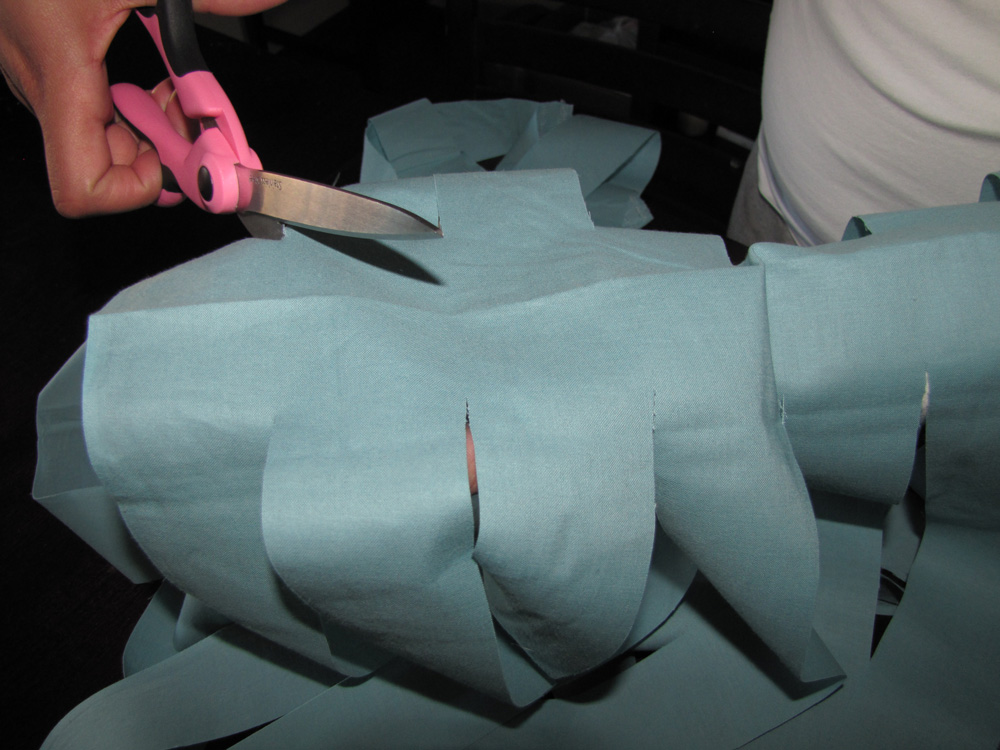
Continue cutting diagonally across the strips until you get to the end of the fabric.IMG_1835-Edited

This step took me a really long time to figure out, I had to stare at the fabric forever and read the instructions over and over again before I made the first cut, IF you did this right you will have a really long 2 inch wide length of fabric yarn. Roll up your basket ball sized skein of fabric yarn and start on your next 10 yards of fabric (or you can crochet what you have and then slice up your next batch later).

Crochet the Rug:

There are two forms that I have tried for the crotchet rug, the basic circle and the octagon. I found that making a “perfect circle” is – at least for me – challenging. My circle always seems to resemble mans’ first wheel invention. I have searched the web looking for blogs or info that may shed some light on what I’m doing wrong but I can’t find what it is. My stitch count is perfect (I know this because I have counted it after every row). It may be my issues with tension. I tend to knit/crochet very tightly so I will make an effort in the beginning to be loose and fluid but inevitably I’m always back to my old habits. I think I may be a bi-polar knitter/crotchet and unfortunately it’s reflected in my circles.  Whereas the octagon which is almost the exact same pattern comes out without any curious angles or sides. You may not experience the same frustration as I did. However, I have noticed from some of the pictures of circular rugs that other people have posted online, that they are experiencing the same challenges making circles, so you may feel more comfortable starting with the octagon shape as well. Who knows?

As I mentioned this is a very easy pattern, the only challenge that I had was keeping track of the stitches and repeats. Regardless of which pattern you choose, I recommend that you use stitch markers. I use a key chain to mark the beginning of the round stitch and bobby pins to mark the beginning of each stitch increase.IMG_1739

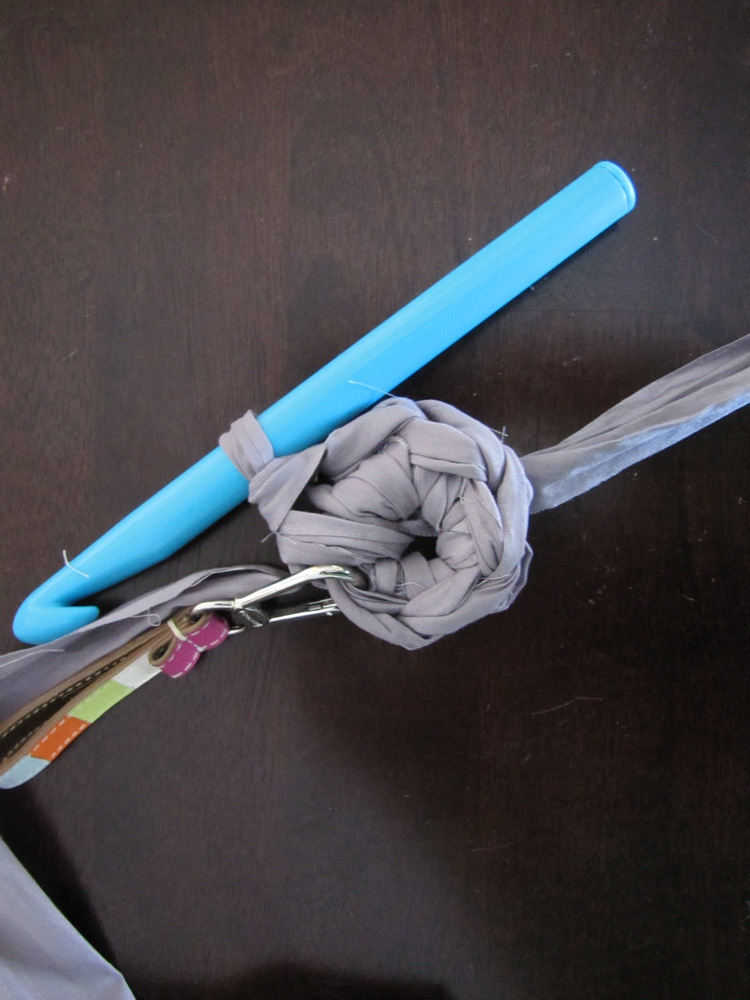
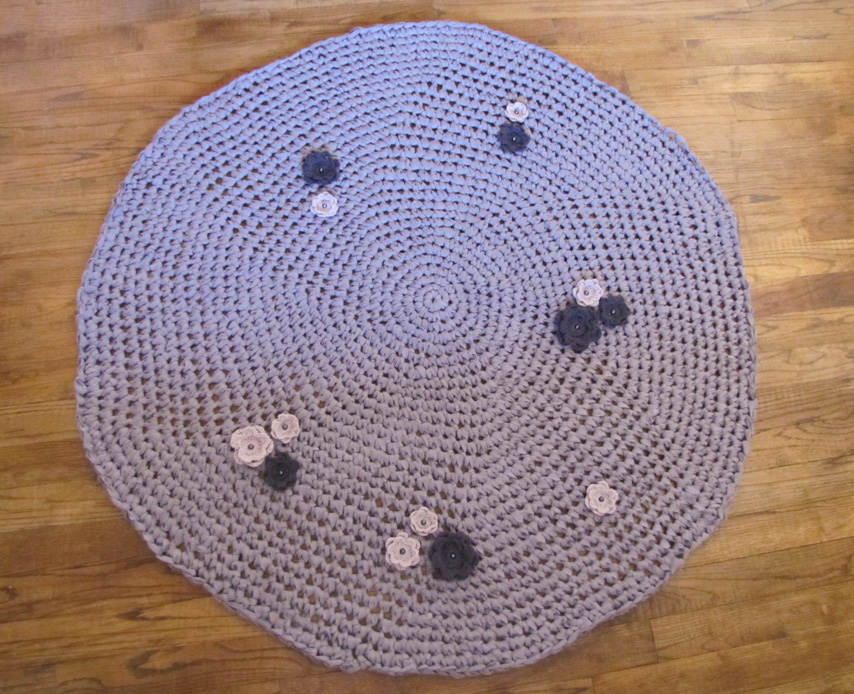
I used the circle rug pattern for this rug. The pattern can be found here. This rug took me about 15 hours to finish. I was able to complete 27 rounds before I ran out of fabric which made the rug a little over 5 feet in diameter. I felt that at this size the rug was too big and looks a bit ridiculous. (picture below is 4 foot rug size).IMG_1752

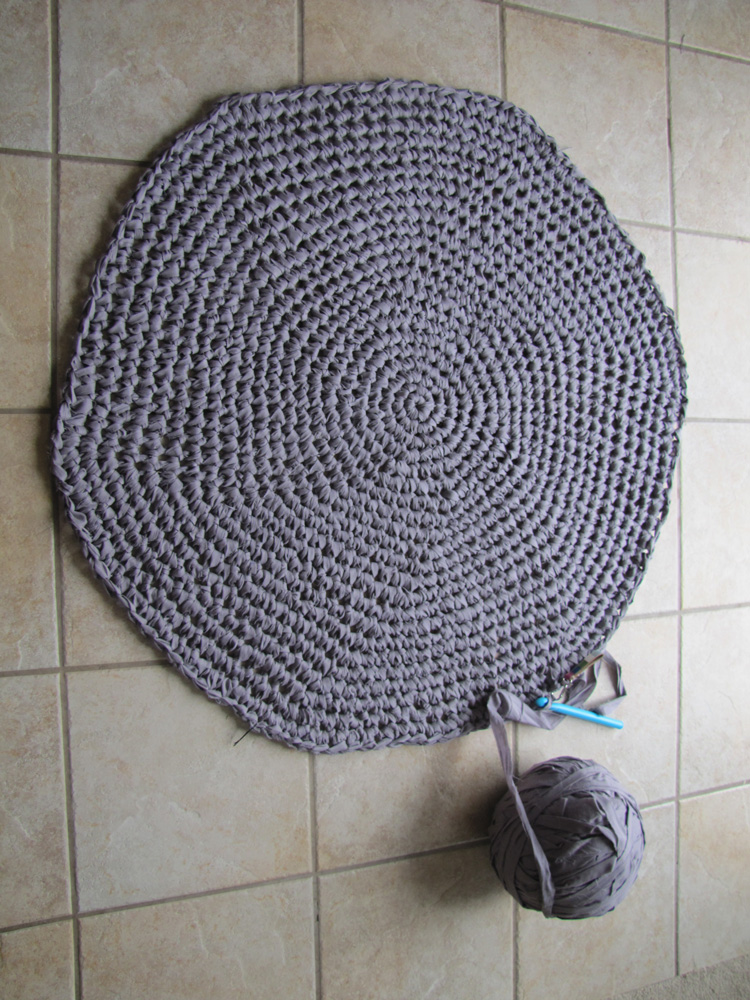
I was curious to see how much I could get out of 30 yards. I think that a rug with crochet flowers should be a accent piece. However, at this size, at least in the three rooms I tried to photograph it in, it looked big and cumbersome. I suppose it would be cute in a nursery or child’s room.

I know that 20 rounds will make a rug that is approximately 4 feet in diameter. IMG_17531

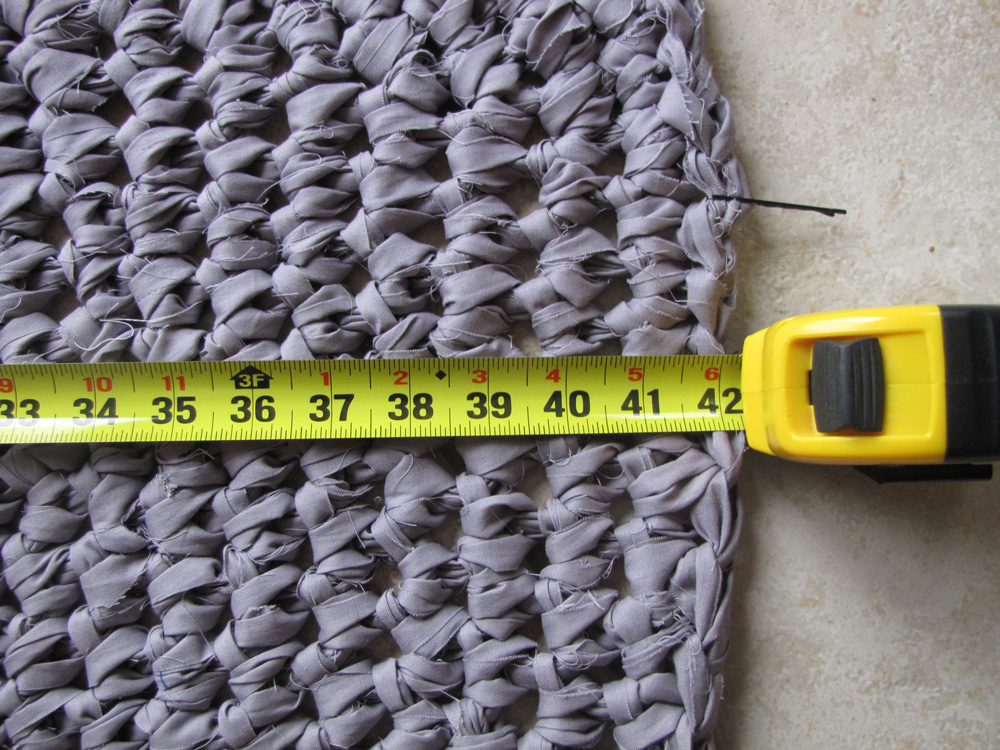
I’m just not sure how much fabric is needed for 20 rounds. You might think it would be 10 yards less, but keep in mind each round is increasing and you are using more and more fabric as well so I really don’t know. I am currently making a rug with measured strips to see how much fabric I need to get a rug with the shortened length so I know exactly how much fabric to buy in the future.

Embellish the Rug:

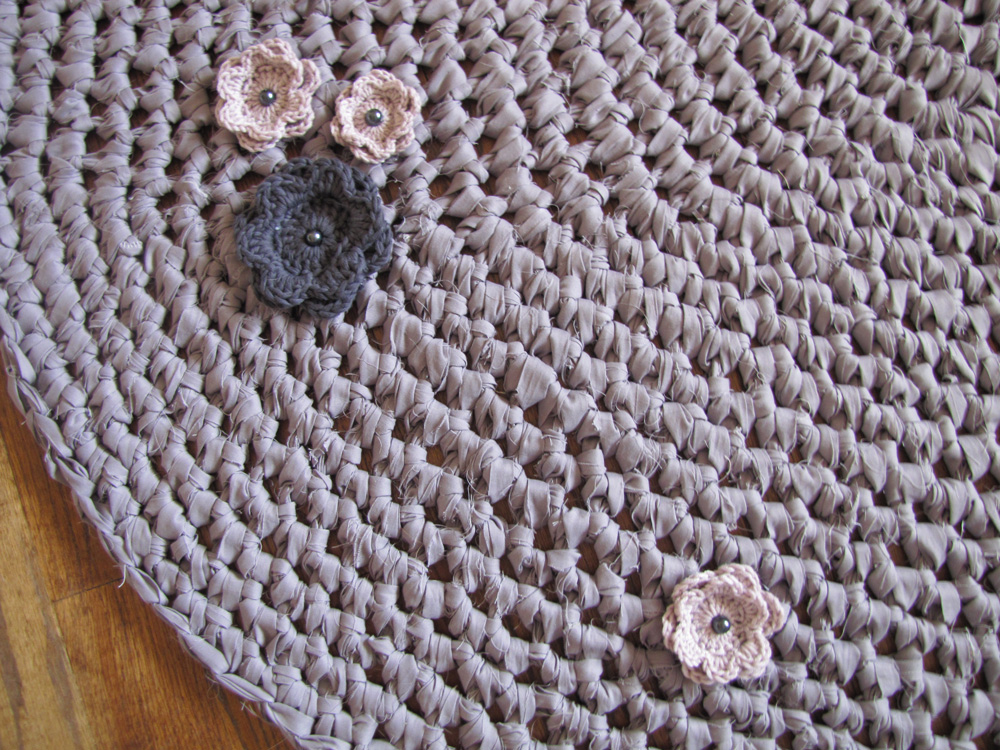
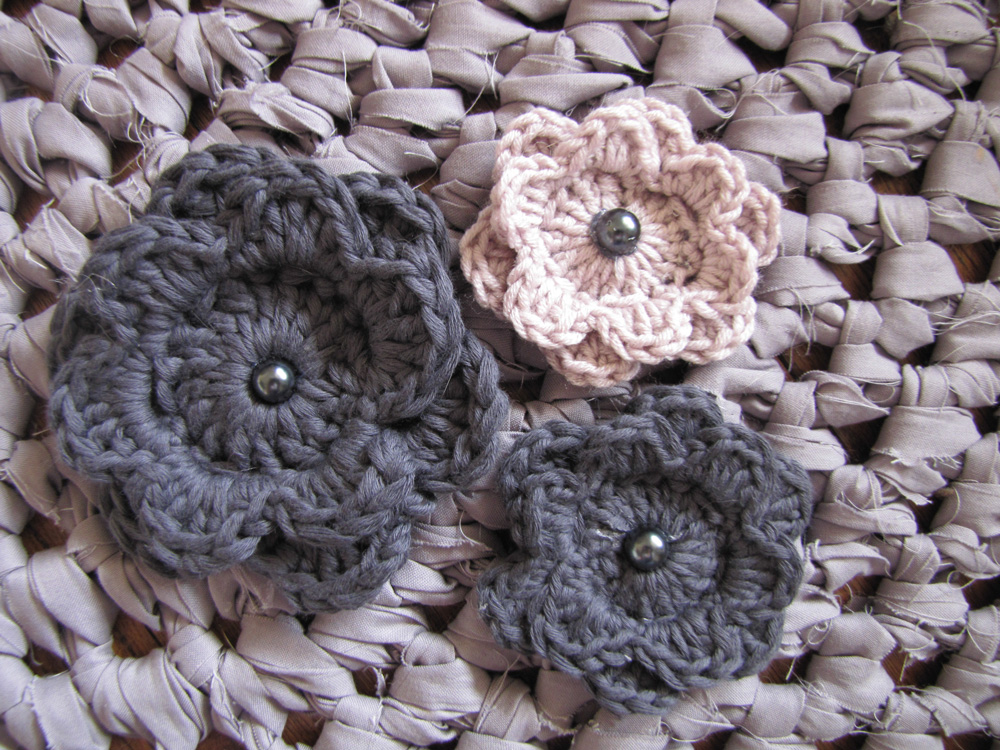
I experimented with about 10 different crochet flowers before I chose the 3D crochet flower pattern.

I acknowledge that it may not be the most practical looking but I loved how it looked once it was finished. The only change I made was that I bound off after row 6 so the flowers weren’t quite so high. I used varying size hooks between D and K for the flowers, for the larger ones I doubled the yarn.IMG_1907

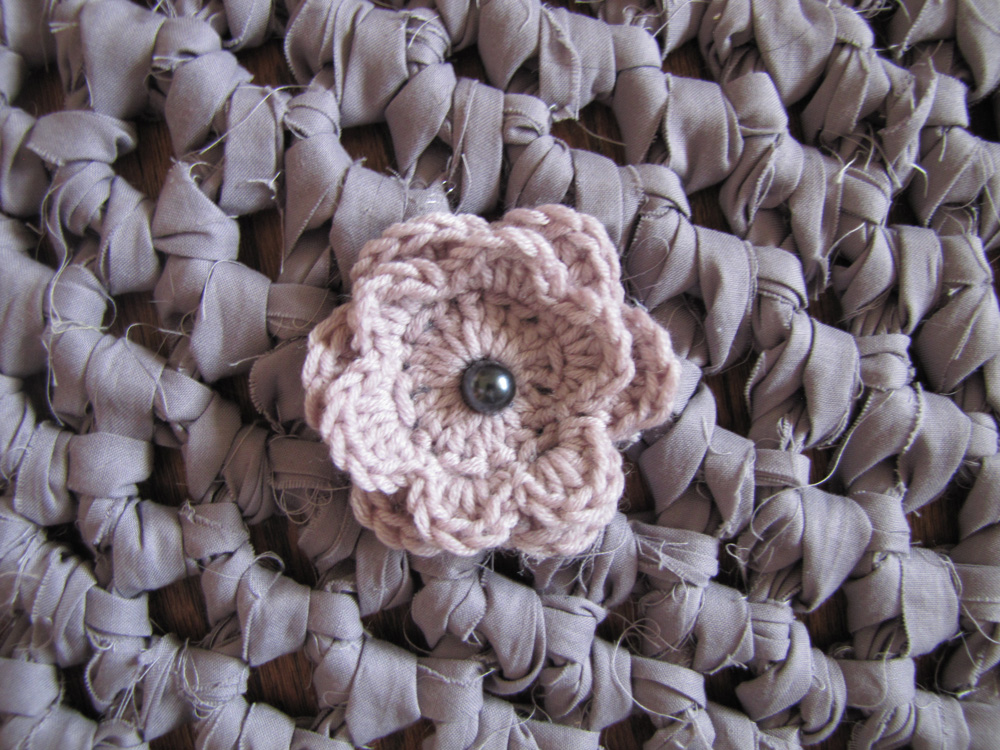
I used glass jewelry beads for the embellishments. I liked these because they had holes for wire or string and I used the holes to sew the pearls into the flowers and then sewed the flowers to the rug. I also used a glue gun for added reinforcement since these will be stepped on and the threads might break over time.IMG_18161

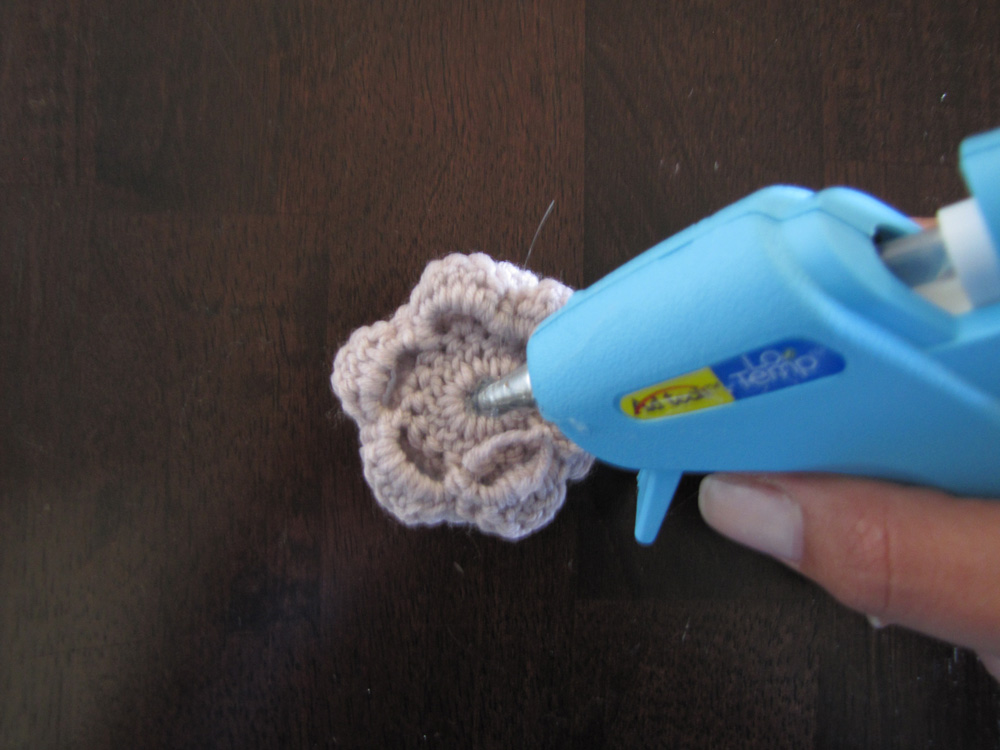
It wasn’t until after I was looking at the rug that I considered what glass pearls might feel like underneath bare feet (as this was a giant rug that would most likely monopolize a room). Not quite like stepping on a thumb tack, but definitely not the best feeling. Unfortunately the glue gun really worked cause those pearls are sure stuck in there! Sorry Mom 🙁
Crochet Flower Fabric Rug

Originally my mother asked for a purple and green rug. Although the fabric that I ordered appeared to be a very deep vibrant purple, you can clearly see that it is not what I received. 95% of the time I think it’s grey. Thankfully, she responded positively to the photos I sent to her of the fabric. She did however, ask for black flowers. I tried. I really did. I tried very hard to give her black flowers but they looked like dead baby crows or dehydrated dog poo that everybody had stepped over pretending they hadn’t seen it, hoping that someone else would pick it up until it became hard black dried crochet flowers.
I even sent her a picture and asked her “do you like this?” I did not receive a reply so I made an emergency veto and went with blue and purple flowers. Hopefully she will find a place for a custom oversized not so purple rug with dark blue and lilac flowers.

Getting Started with Home Beer Brewing

Usually I’m the one in the house working on crafting and Do-It-Yourself projects. But when I saw my husband, Lee getting his beer brewing supplies ready for the next batch I begged him to write a special blog for my site.

I’m a complete beginner to brewing beer at home. There are a lot of different brewing techniques and virtually endless number of beer and ingredient combinations. Beer supply stores both local and online sell kits that include everything you need to get started. These can range from around $75 dollars all the way up to $300-$400 for an all grain starter kit. For myself, I bought just a cheap kit with the plan to build on as my interest grew. This has been a really fun new hobby and I have pretty much dove in head first.

Today, I’m brewing a Black IPA. A Black IPA is hopped like an IPA but with a rich dark malt rather than pale malt. As you might expect, brewing different types of beer, there are different processes for each. As compared to other kits this is a pretty intense with 2 malt additions, 6 hop additions (plus dry hopping), and a corn sugar addition.

As we go through the process I’ll try to keep the process relatively general. This will just barely scratch the surface of home beer brewing…there’s lots to learn.

Getting Started:
First things first, take an inventory and make sure you have everything you need. Your beer kit will come with all the ingredients you need, but also make sure you have sanitizer, ice, good quality water, etc. You won’t be able leave during the boil so it is absolutely necessary to have everything.

Beer Brewing
Ingredients:
Specialty Grain
3.15 lbs of dark malt syrup
6 lbs of dark malt syrup
1 lb corn sugar
1 oz Summit hops
1 oz Chinook hops
1 oz Centinnial hops
1 oz Cascade hops
1 oz Centennial hops
1 oz Cascade hops (dry hop)
Safale US-05 Ale Yeast

Other Stuff:
Kettle at least 3.5 gallons
Mesh Grain Bag
Star San Sanitizer
Timer
Ice
Beer to Drink

Beer Kit Ingredients

If you have everything you need now’s the time to crack a beer and let’s get started.

Make the Wort:
These steps apply if you’re making beer with an extract kit. If you’re going all grain you’ll have to extract the sugar from your malted grains first.

Beer Pre-Boil

Start by measuring out about 2.5 gallons of water. I use bottled spring water. Tap water will also work fine as long as you have good tasting water. Start heating the water in your boiling kettle. If you have specialty grains in your kit, now is the time to add them. Place them in the mesh grain bag and hang them off the side to steep just like tea. After about 20 minutes or once the pot reaches 170 degrees remove the grains. Bring the pot to boil.

Once it reaches boiling it is time to add your first round of malt extract. First remove from heat. This prevents any of the malt extract that might reach the bottom of the pot stick down there and burning. Pour the malt extract in slowly slowly and stir to combine. Once it’s fully mixed return to heat and to boiling.

Add Malt

Congratulations, you now have what’s called the “wort” – a brewers term for unfermented beer.

The Boil:
Once you get the pot to boil again you’ll usually be instructed to add hops. You will add hops throughout the boil to allow the beer to take on the unique characteristics of each type of hop and blend with your malt. Follow the instructions on your kit for hop addition times. For this Black IPA, add the Summit hops and set the timer to 60 minutes.

Watch out for boil overs! While this won’t ruin your beer it will leave a sticky nasty mess for you to clean up. If you think the pot is about to boil over reduce heat and stir the wort.

SanitizeWhile you’re boiling it’s a good time to start sanitizing your primary fermenter and anything else that might touch the beer after boil. I usually just fill the fermenting bucket with water and Star San and throw everything else that needs to be sanitized in the bucket.

With 15 minutes left it is now time to add more hops and malt extract. I quickly stirred in the malt extract and added the recommended hops through to the end of the boil. There is also a late addition Corn Sugar added, my first experience with Corn Sugar.

Cooling the Wort:
Next step is to cool your finished wort as quickly as possible. The most convenient cheapest way to do this is a simple ice bath. I put the boiling pot in the sink and fill it with ice and a bit of water.

Cool Wort

We need to get the temperature down to 100 degrees as fast as possible. Since the wort is no longer boiling it’s fully open to contamination by anything that might find its way into it. Leave the pot covered and open just a crack to allow steam to escape. This normally takes around 45 minutes.

Move Wort to Fermenter:
Next step is to move the beer to the primary fermenter. Empty out your sanitized fermenting bucket and fill with 2 gallons of water. Pour in your cooled wort, and then fill with water to reach 5 gallons. Agitate the wort to oxygenate it by rocking the bucket back and forth.

Pitching Yeast:
Time to add your yeast. Depending on what kind of yeast you are using, you may have had to activate the yeast prior to brewing. With the Black IPA kit I used dry yeast. Many kits will recommend you pitch it directly into the wort. In the book “How to Brew” by John Palmer, he recommends rehydrating the dry yeast before pitching it. I tried this out for the first time with this batch, and we’ll see how it works out. I would highly recommend this book for anyone that wants to expand their knowledge beyond the standard brew kit instructions.

FermentationFermentation:
Place the top on your fermenting bucket and seal all the way around. Add some water to your airlock and place into the whole in the lid. Move the bucket to a dark, undisturbed location with temperatures that are regularly between 60-70 degrees. Depending on the type of beer you’ll need to let it ferment at least 2 weeks in the primary fermentation bucket. Most recipes also require secondary fermentation. If you don’t have a secondary fermenter you can sometimes leave it in the primary for an additional week or two to finish fermentation. This Black IPA will require secondary fermentation in a separate fermenter where it will be dry hopped.

Bottling:
Bottling or kegging your beer is the last step. I won’t cover much on this here, but I can tell you the key is to be very clean. Clean and sanitize everything extensively to eliminate any contamination. After 1-2 weeks of bottle conditioning you’ll be ready to enjoy the fruits of your labor.

New Year, New Juice Fast

IMG_1581This is not exactly crafty but it’s the start of a new year so of course I, like most women, have made big promises of healthy eating and exercise. I decided to start the new year off with a juice fast that worked really well for me last summer and I thought I’d share the experience and some tips that hopefully will motivate and help you as well.

Last summer (while eating a giant bowl of Kraft Macoroni and Cheese) I watched a documentary on Netflix called Fat, Sick, and Nearly Dead. Basically an Australian guy decides to stop eating fattening foods for 60 days and drink nothing but liquid veggies for breakfast, lunch, and dinner under the supervision of a nutrionist. Despite that fact that he’s a FAT AUSTRALIAN GUY, he travels to America and interviews happy fat Americans while he quickly and smugly slims down.

Joe: sipping juice “Are you ok with the fact that you will probably die before you are 50?”
Fat American: “What can I say it’s finger lickin good!”
I’m exaggerating, barely.

I will not spoil the documentary further by telling you how much Joe lost or the long term effects. I think it’s important to watch it if you decide to try juicing but I will share some tips and links so that you are prepared when you began juicing.

IMG_1587

Getting Started

Be Informed
First as I mentioned above you need to watch the documentary. My blog, although crucial to your juicing journey is not a substitute. If you do not have Netflix, you can also watch it for free here.

Medical Advice
Next, I recommend that you talk to your doctor about your plans and goals. They might tell you that you this is not the diet for you, or that you need to take a blood test like Joe did while you are on the diet. I did talk to my doctor before I started the juice fast. I showed her the recipes and talked to her about my weight goals and she did approve the diet as long as I “listened to my body.”

Buy a Juicer
Once you have consulted with a doctor, It’s time to invest in a juicer. Grasshopper, this is not the place to be thrifty. Decide what is most important to you before you purchase your juicer.IMG_1565Lee and I (mostly Lee) researched several juicers before we purchased ours.

Lee says: The two most popular types of juicers are centrifugal and masticating. Centrifugal juicers are most common and have a grinding disc and basket that spin at high RPMs to extract juice. Centrifugal juicers are usually less expensive but are not as good with leafy vegetables. The masticating juicer has a gear that essentially grinds and crunches the fruit fiber to extract the juice. The masticating process is generally considered to yield more juice than the centrifugal juicer. Masticating juicers also tend to be more expensive, have a longer life, and are not as good with fruit. There are many pros and cons to each. A good place to start your research is joyfuljuicer.com.

We picked up a Breville juicer which was the same brand Joe used in the documentary. The main reason we went with the Breville juicer was that it was affordable, versatile, and durable. The reviews were generally very good. We still use it about 2-3 times a week and it works great. However, our only complaint is that we hate cleaning it. – I’m not sure how to avoid that though.IMG_1548

Recipes
This site saved us in the early days of our Juice Fast. These are the actual juices that Joe used in the documentary. The first two are the ones that I personally like, the last two taste like dying!!! I also experiment a lot, usually when there are fruit and veggies that are going bad in the fridge. Most of the experiments are horrible.

Lee’s Ridiculously Sweet Pretend Coffee
10 strawberries
20 grapes
2 green apples
Yes, he actually counted these out every morning. It amazes me what you coffee fiends do to get your fix. It’s REALLY sweet but gives you a lot of energy. He said it gave him more energy then coffee. I read somewhere (or maybe I made this up) that it’s ok to start your juice fast with more fruit then veggies, especially if you have an issue with the taste. However, you want to slowly start adding more veggies into your drinks.

IMG_1524-EditedWhat I’ve Learned From Juicing

  • Don’t juice the lemons in the juicer, just squeeze them in. I juiced half a lemon by itself. It’s like 1 dropper of liquid. Whereas if you squeeze it…well it’s like a tablespoon, but still that little bit of lemon goes a long way to make your juice taste less like landscape. Especially during the early days of juicing
  • Personally I think that ginger makes no difference at all to the juice. Lee says it does but I think it’s because he knows I don’t put it in anymore and he likes to be ornery.
  • Nine times out ten if something tastes funny in your juice it’s the cucumbers. I always eat a little piece of my cucumber before I juice it.
  • Each recipe on the website link above makes about two servings. One “meal” for two people, or breakfast and lunch for one. You will very quickly learn that the worst part about juicing is cleaning the juicer, counters (and if you have a spouse, the cabinets) so plan ahead. Whatever you make is going to stay fresh for about 2-3 days. After that it’s going to turn brownish and start to taste awful, so decide how much you can drink in that time and make that much. This is a good way to stay on track and develop good habits. (oh man, no juice… oh well I’ll just eat this donut instead.. etc.)

What To Expect During The Fast

    • The first few days are going to be hard. You drinks taste like grass and you probably have to give yourself pep talks to get through them. You will think about chewing weird things like candles and fingers. You will have no energy. Your body is going to go through a detox, which will probably cause headaches. I felt like my brain was trying to evacuate my body. A lot of the foods you eat have preservatives and chemicals in them that make you addicted to crazy things like raspberry flavoring number 5. It’s hard but it only lasts for 2 or 3 days.
    • During those first 2 or 3 days, every show, book, song and store you drive by is going to be about food and you’ll find that nobody cares about your goals. It’s probably best to just stay in your room with the lights out. It might be the easiest way to contain your brain if it does escape anyway.
    • By day 5 you’ll start to feel better. You will find it difficult to finish your drinks because they will fill you up. If you do get hungry but don’t want to “eat”, make a veggie plate or a plain sweet potato. I did read a blog about someone that actually ate the pulp in the juicer… kinda weird but whatever gets you through the fast.

I lost about 20 pounds in 3 weeks on the juice fast. After that I started to incorporate healthy dinners into my diet, but I still had juice for breakfast and lunch for a week. Eventually I stopped juicing altogether, but I tried to watch my portions and still eat healthy foods. I found that I did not have issues with increased appetite like I normally experienced with other diets and I didn’t immediately gain the weight back like you might expect with a juice fast. Periodically, Lee and I have also done mini juice fasts that last 3-5 days and we always try to keep the ingredients in the fridge so we can substitute lunch or breakfast with juice anytime. It’s also a great way to just add veggies to your diet or deal with the munchies in between meals.

If you decide to try the juice fast, let me know how it goes and what your results are.

Holiday Thank You Cards

IMG_1504IMG_1502I decided to send out handmade thank you cards for the gifts that we received this year. I am still new to paper crafts so I wanted to try something that would be pretty but not so challenging that they wouldn’t be received until sometime this spring.

What I used:IMG_1430 Edited
Martha Stewart Craft Punch – Arctic Snowflake
Martha Stewart Craft Punch – Alphabet
3.5in x 4.8in White Cards
Card Stock Colors: Navajo, Patina, Turquoise Mist, Avalanche, Ocean Breeze
Mod Podge

Tools:
Paint Brush
Scissors
Exacto Knife
Friskars Super Cut Paper Trimmer

Paper Trimmer:
The first step is to determine the size for the border. To determine the border, measure the width and height of your card. I went with .5 inch IMG_1485 Editedborder. The cards I used are 3.5in x 4.8in so the card stock should be cut to 2.5in x 3.8in. Using the Paper Trimmer, cut the card stock to the dimensions you picked.

When I originally bought the supplies I asked the Michaels associate what would be the best cutting tool to use. She suggested the exacto knife. I specifically asked her about the cutting board because they were on sale but she said that I wouldn’t need it for this project. I wasted two sheets of card stock and way too much time cutting crazy crooked not so exacto lines before I went back to Michael’s and bought the paper trimmer. I just wish I’d started the project when the sale was still going. GRRRR! But hey, you might be someone who can use the exacto knife and make straight lines with no problem. I cut all of my card stock in the three colors first because I wanted to mix the different color snowflakes between cards.

Craft Punch:
Use the Martha Stwewart Craft Punch to cut out the snowflakes. Remember this is the card stock you will be gluing to the thank you cards IMG_1444 Editedso be creative with your punching. Also be careful that you don’t punch too close to the previous punch or to the edges of the card stock.

I recommend that you punch all of your card stock before you start the next step. This serves two purposes. When I planned out these cards in my head I didn’t plan to glue the snowflakes back onto the cards. If you like the way the cards look as is, then go with it, but you also have the option to glue the snowflakes back onto the cards. I mixed the colors of the snowflakes on a few of the cards. I was really surprised by how great they looked. I almost decided to save these for christmas cards for next year. But I convinced myself that by next year my card making skills will be so advanced that they will almost be 3D holograms.

Mod Podge:
Use the paint brush and Mod Podge to glue the card stock to the card. This can be tricky because the card has snowflakes cut out of it. I found that applying the Mod Podge directly to the card, not the card stock got the best results. I also find it helps if you use a paint brush with a tiny pointy edge to dap glue into the tiny edges to get a firm fit.

Next, Glue the snowflakes down. In this case, I applied the mod podge directly to the snowflakes and then once I applied the snowflakes to the card I wiped the excess mod podge away.

In my opinion Mod Podge dries cleaner then a glue stick or elmers glue will and you can wipe the excess away without it leaving a sticky residue or any weird splotches on the card.

Fill in the Blank:IMG_1490
Make sure you write something personal inside. Nothing is lamer then a handmade card with nothing but “Love, Your Name” inside. : )


Frosted, The Mason Jar Snowman

IMG_1334 Edited-2IMG_1378IMG_1336 Edited-2I got the idea for the mason jar snowmen while I was working on my holiday gifts. I needed a jar for the sugar cubes I made for friends and family for Christmas. I love gifts that can be practical and beautiful. I’ve become a big fan of upcycling and I’d been wanting to experiment with frosted spray paint. I had 5 mason jars that I’d gotten from Tokyo Joe’s restaurant that I thought would be perfect. I love how the white sugar cubes add to the “snow” effect and it’s a gift that can be reused for decoration or refilled with something next year during the holidays. (I hope)


What I used:
Mason Jar w/lid
Black spray paintIMG_1258
Frost spray paint
Clear sealant spray paint
Super glue (I recommend the kind with a brush)
Orange Felt
Ribbon (I recommend wire edge)
Paint (white, black) and any colors you want to paint your scarf if you choose this option

Tools:
Scissors
Glue Gun (optional)
Paint Brush
Masking Tape

I put my snowman together in the below order because it helps me keep my face centered. I like crafting and being creative but I’m not the most artistic or good at tiny details, so “dressing” the jar in a scarf and ear muffs reduced my error rate. You do not have to do it in this order.

Frost the Snow Jar:
Clean the jar thoroughly. Cover the rim of the jar with masking tape to protect it from the frost spray paint. I also put spray paint can tops into the jar to protect the inside from any fly away spray paint. Lightly spray the jar with a thin layer of frost and let dry. IMG_1147 EditedRepeat 2-3 times or until you feel that the jar is frosted to your desired level of frostiness. Apply two coats of sealant to help protect the frost from chipping.
The frost won’t stick to a jar that has any oils from your skin so stick your hand inside the jar to complete the instructions. Be sure to put something over the top to prevent any rebel spray paint drops and don’t skip that sealant. The first jar that I frosted chipped badly when I put it under running water to clean it. I didn’t even use soap or scrub it. So invest the time and $4 dollars on a can of sealant.

Old Silk Hat:
Spray paint the lid black. I used three coats and a clear sealent to try to protect it from chipping.

I put a glitter overlay on one hat, which I have to admit was my favorite! I’m a little glitter crazy right now so I put the glitter away and stuck to the traditional flat black hat.

Make it Snow:
I believe this step is pretty self explanatory. However if not, dip a pointed paintbrush into the white paint and randomly dot it on the jar. Remember, no two snowflakes are the same (sorry couldn’t resist).

The snow serves two purposes. First, in my opinion it gives the jar dimension. Second and more importantly frosted spray paint has the flaw I mentioned previously. Adding “snowflakes” covers up any chips and also helps to protect the jar from future chips.

Scarf:
You have two choices. You can pick a festive ribbon that you love or find a ribbon/fabric that you want to paint. I recommend that you choose a wire edge ribbon as it clings to the glass and prevents slippage. (I used puffy paints because they wereIMG_1394 Edited-3 close at hand and dried really fast.) Once you’ve made your ribbon choice, wrap it around the jar as tight as you can and knot it about 2/3’s of the way down the jar. Cut the ends and slip it off. Untie the scarf and with a glue gun apply a thin layer of glue to the scarf and quickly retie it to the jar…this glue dries fast! 

I choose to paint my ribbon because I liked the rustic country look. It also allowed me to make each snowman somewhat unique without buying 5 different ribbons. This step is really up to your discretion. I only did this to about 1/2 of my jars, because I kept changing my mind about wether or not it made sense. No matter how tight you retie the scarf it slips. However, once it’s glued it’s going to be a pain to rinse or wash the jar. Granted, the ear muffs aren’t exactly water proof – but still, it’s something to consider.

Earmuffs:
I got lucky with this, my jar had two seams down the sides so I knew where the exact middle was. The most important thing to remember about using superglue is that your decision is semi-permanent. If you pull the earmuffs off, you’ll also pull off a little bit of your snowman. I suggest starting small, if you glue a small part of the earmuffs to the glass and it’s uneven you have some room to manuever them by moving parts of the muffs around and gluing that edge down. If it’s a lost cause and your muffs are hopelessly crooked you can pull it off and cover a small glue spot with a slight shift.

I screwed the lid on as well to help me get an idea of where everything fit. I know it sounds like a small step, but this really helped me with placing the earmuffs evenly.

Face:
By now you will have narrowed the expanse of your snow jar greatly, so it’s time to create your face. The snowman has a classic smiley face. : ) I made the eyes pinprick small and then drew a smile with dots. The first time you do it I would suggest keeping the smileIMG_1399 somewhat small as well until you think you are finished. You can add on, but it’s tricky to get rid of black dots. Next, I attached the nose (see nose instruction below). Once the nose was attached, I enlarged the eyes and filled in the smile.

It may seem like a strange method, but my first snowman looked like something out of a b-rated horror film. It’s very difficult to sweeten a killer snowman. By starting small and building the face slowly you give yourself room to “edit.” The small dab may start out as the center of your eyes but once you attach the nose you may discover that they are too close together – let that be the corner of the eye instead, etc. Another reason to start with small dots is if you make a mistake that can’t be fixed with creative maneuvering, you can cover it up with a white snowflake – just be sure that the black paint is completely dry first otherwise you will make dirty snow.

Nose:
The nose should resemble a triangle but also have a 3D look. Cut out a larger size triangle and glue the top two corners together. This will give it a sort of beakish look. To keep the 3D effect only place glue on the top half and affix it to the jar. 

Surprisingly, at least to me the nose was the hardest part (as you can see from IMG_1187 Editedthe multiple cuts in the felt). I put it at a slightly upwards angle so that it doesn’t lay flat against the jar. Just remember be sure you are committed to the spot. If you pull the carrot off it will pull the frost off as well and you’ll have an ugly spot. My snowmen were going be a tribute to the classic holiday song “Frosty The Snowman”. In the song Frosty didn’t have a carrot nose. He had a button nose. While I waited for the spray paint to dry on the frosting jars I made a practice jar, and I’m so glad I did. The button nose was a fail. It turned my snowman into a snow bear and now I have a very strange cup holder. If you are following this post and making your own snow jar and had the same aspirations as me, I hope my fail will save you time and disappointment.IMG_1333 Edited-2

As you can see your snowman is complete! You can keep your snowman empty as decoration, or fill it with sugar cubes, cotton balls, q-tips, or even place a votive candle inside for a festive glow.